
 Author:
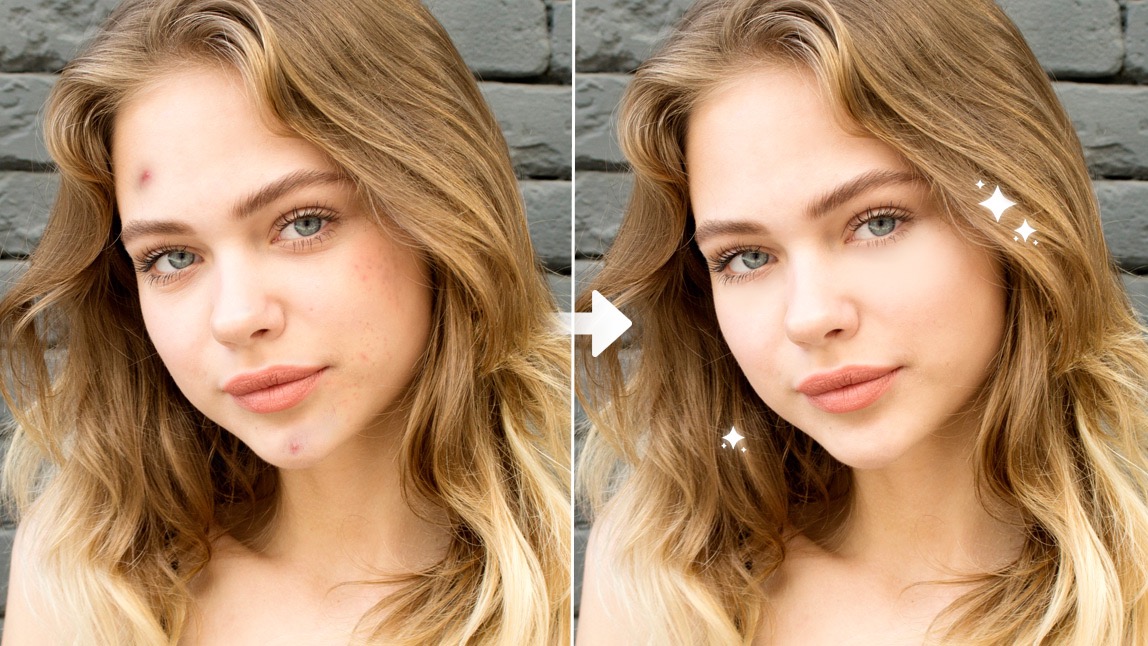
If you’ve ever snapped what should have been the perfect selfie - great lighting, great angle, great hair day - only to discover a surprise zit staring right at you… welcome to the club. We meet every day, usually right after opening the front-facing camera.
The good news? Those unexpected visitors (pimples, dark spots, redness, little “why are you here?” bumps) don’t have to steal the spotlight. With the right photo blemish remover, you can keep every selfie smooth, glowy, and totally post-worthy, no concealer required.
In this blog, we’re diving into how YouCam Makeup’s ultra-smart blemish photo editor can help you erase imperfections in literal seconds.
Why Use a Photo Blemish Remover in the First Place?
Let’s be honest: We all get blemishes. Stress, hormones, that one dessert we said we probably shouldn’t have had - whatever the cause, imperfections pop up at the most inconvenient times.
But editing your photos isn’t about pretending you’re perfect. It’s about capturing how you felt in that moment.

A photo editor to remove blemishes, like YouCam Makeup, keeps things natural. No blurry skin. No waxy finish. No “who is that and what did they do with my pores?”
Instead, the app gently clears up acne, dark spots, and redness without touching your real-life features. You still look like you, just the well-rested, well-lit version.
How To Remove Blemishes From Photos (In Seconds!)
Ready to try it yourself?
Here's your step-by-step guide to achieving radiant, smooth skin in every shot using YouCam Makeup.
Step 1: Download YouCam Makeup
You can grab the app for free on both iOS and Android. Once it’s installed, prepare for some serious glow-ups.
Step 2: Navigate to Face Retouch
Think of it as your virtual vanity table, minus the clutter and the 17 lip balms.
Step 3: Upload Your Selfie (or Snap One Live)
 Feeling confident? Take a fresh selfie right in the app.
Feeling nostalgic? Upload one from your camera roll.
Feeling tired? We’ve got eyebag removal for that later.
Step 4: Select “Blemish” and Watch Magic Happen
 As soon as you tap Blemish, the app detects imperfections and removes them automatically. No dragging, no tapping each spot manually, no editing acrobatics.
It’s instant. It’s clean. It’s extremely satisfying.
If you’re the detail-oriented type, you can tap each blemish individually with Manual editing. It’s the photo-editing equivalent of popping bubble wrap.
Step 5: Enhance Your Selfie Even More (Optional… but tempting)
 Once your skin is smooth and glowing, you can explore more tools:
- Teeth Whitening (your dentist will approve)
- Eye Bag Removal (perfect for “I only slept 4 hours” days)
- Face Smoothing
- Makeup Filters for easy glam
- Redness Reduction
- Overall Retouching Tools
Play around - just keep it natural and true to your aesthetic.
Step 6: Save & Share
Once you’re happy with the results, save your photo, export it, or send it directly to your best friend group chat so they can marvel at your mysterious overnight glow-up.
Tips to Keep Your Edits Looking Natural
A good edit is like a good skincare routine: subtle, enhancing, and believable.
Here’s how to keep things real:
1. Use Automatic Detection First
The AI does a pretty great job at identifying only what needs fixing. Start there before going into manual mode.
2. Avoid Over-Smoothing
Texture is beautiful! YouCam Makeup keeps pores intact, but try not to go full “porcelain doll.” Your friends know you’re human.
 3. Add Just a Touch of Makeup
The app’s makeup filters are fun, but sometimes the softest lipstick or faintest blush can boost realism.
4. Match the Lighting
If your photo has soft natural light, choose subtle enhancements. If it’s a glam nighttime shot, feel free to go full glam.
5. Keep the Original for Comparison
The “Before/After” tool is addictive. You can use it to ensure your edit looks balanced and natural.
Your Smooth-Skin Selfie Awaits
Your next flawless selfie is only a tap away. Whether you’re clearing up a tiny spot before posting to Instagram or giving an important headshot a subtle refresh, a photo blemish remover, a blemish photo editor, or a photo editor to remove blemishes can make a huge difference.
And YouCam Makeup stands out as the easiest, fastest, and most natural-looking blemish remover app you can use. Ready to see how smooth and glowing your selfies can look, without losing your real skin texture?
Download YouCam Makeup on iOS or Android now and start editing like a pro. Your camera roll will thank you.
Photo Blemish Remover FAQs
What is the best app to remove blemishes?
The best app to remove blemishes is YouCam Makeup. Its AI-powered Blemish tool instantly detects and removes pimples, spots, redness, and marks while keeping natural skin texture. You can edit automatically or use Manual mode for precision, making it one of the fastest and most reliable mobile tools for clean, smooth selfies.
How to remove blemish from a photo?
To remove a blemish from a photo, use an app with an AI blemish removal tool like YouCam Makeup. Upload your photo, go to Beautify or Retouch, and tap the Blemish feature. The app will automatically detect and erase imperfections. You can refine edits manually and save your retouched photo instantly for a clean, natural result.
How do I edit a blemish on my iPhone?
You can edit a blemish on your iPhone using YouCam Makeup. Install the app, upload a photo, and open Beautify → Retouch. Select Blemish to remove imperfections instantly with AI detection. If you prefer control, switch to Manual mode to tap and erase specific spots. Save your finished photo directly to your iPhone.
Can I retouch a photo on my iPhone?
Yes, you can retouch a photo on your iPhone using YouCam Makeup. After installing the app, upload a selfie and navigate to Beautify or Retouch tools. You can smooth skin, remove blemishes, whiten teeth, brighten eyes, apply makeup, and adjust facial features. The app offers natural-looking edits and saves your enhanced photo to your device.


