 Author:



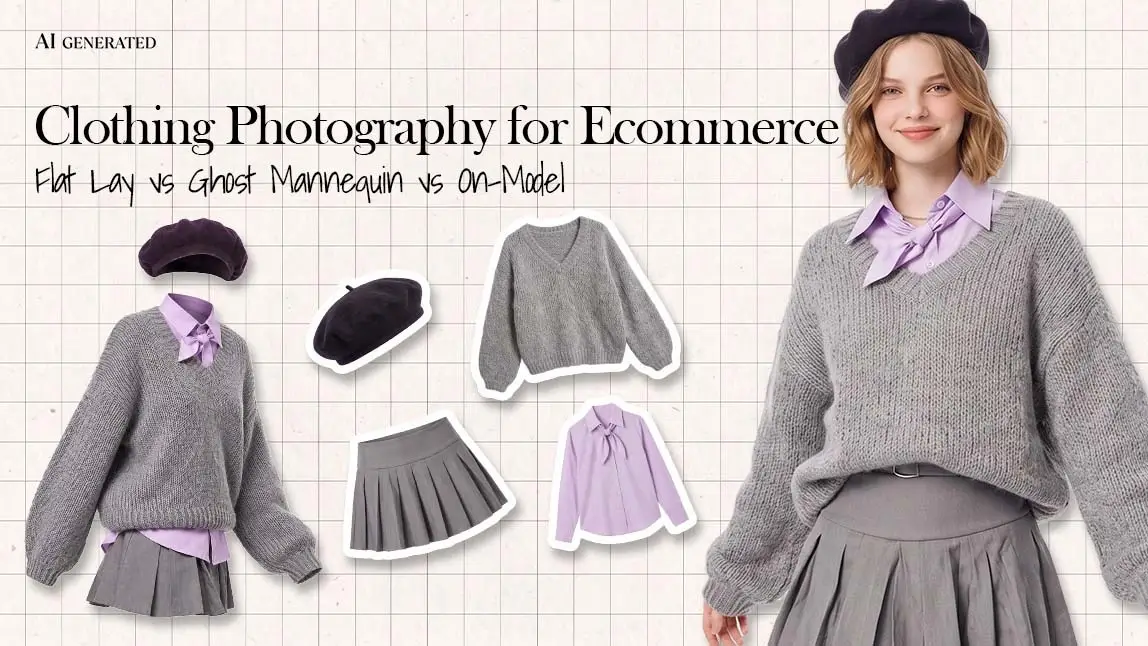
Clothing photography for ecommerce comes down to three core methods. Flat lay photography, where the garment is laid on a surface and shot from above, is the fastest and cheapest, and it shows color, print and detail clearly. Ghost mannequin photography, where the garment is shot on a mannequin that is later edited out, shows shape and structure without a model. On-model photography shows how a piece fits, drapes and sits on a body, which is what online shoppers try hardest to judge, but it takes the most time and budget to produce. Most clothing stores combine all three, choosing the lead image by category.
This guide compares the three methods side by side, shows which one to lead with for each type of clothing, walks through a home setup that works with a phone, and explains where AI virtual try-on now fits in. With Perfect Corp.'s AI Clothes Changer API, a front-facing product image of the garment, or a photo of it worn by a model, can be placed on a brand's own model photo, so the flat lays a store already shoots can also become on-model images.
Table of Contents
- Types of Clothing Photography for Ecommerce
- Flat Lay vs. Ghost Mannequin vs. On-Model Photography
- Which Method Works Best for Each Clothing Category
- Check Marketplace Image Rules Before You Shoot
- How to Set Up Clothing Photography at Home
- Where AI Try-On Fits: From Flat Lay to On-Model
- Adding Virtual Try-On to Your Catalog Photo Workflow
- FAQ
- Conclusion
Types of Clothing Photography for Ecommerce

Every product gallery is built from a handful of shot styles. Knowing what each one communicates makes it easier to plan a shoot around what shoppers actually need to see.
Flat lay clothing photography
The garment is laid flat on a clean surface, usually white or a light neutral, and photographed from directly overhead. It needs very little space or equipment, so it is the default for new sellers and high-volume catalogs. Flat lays are strong on color, print, graphics and construction details. Their weakness is shape: a flat garment doesn't show length on the body, drape or how a cut sits on the shoulders.
Hanging clothing photography
The garment hangs from a wall hook or hanger against a plain backdrop and is shot at eye level. It is quick and shows natural drape a little better than a flat lay, which suits dresses and lightweight tops. It can look less polished, so it works best as a secondary or social image rather than the main product image.
Mannequin and ghost mannequin photography
Mannequin photography puts the garment on a dress form so it holds a body-like shape. In ghost mannequin photography (also called invisible mannequin photography), the mannequin is removed in editing. The usual method is to shoot the garment on the mannequin, shoot the inside of the neckline and back separately, and composite the two so the garment looks worn by an invisible body. The result shows structure, collars and silhouette with a clean, consistent look, but it depends on careful editing, either in-house or through a retoucher.
On-model photography
A person wears the garment, either in a studio or in a lifestyle setting. It is the clearest way to show fit, proportion, length and how fabric moves. It is also the hardest to scale: models, styling, locations and reshoots all add cost, and keeping a consistent look across hundreds of SKUs takes planning. For a deeper look at this format, see AI on-model photography for fashion ecommerce.
Detail shots
Close-ups of fabric texture, stitching, closures, prints and care labels sit alongside whichever main method you choose. They answer the quality questions that a full-garment image can't, and they are easy to shoot at the same time as a flat lay.
Flat Lay vs. Ghost Mannequin vs. On-Model Photography
The three methods trade speed and cost against how much they tell a shopper about fit. This comparison covers the factors that usually decide the choice.

| Factor | Flat lay | Ghost mannequin | On-model |
|---|---|---|---|
| What shoppers learn | Color, print, graphics, details | Shape, structure, neckline, silhouette | Fit, length, drape, styling |
| Setup | Surface, backdrop, window light or one light | Mannequin, lighting, a second inside shot | Model, styling, studio or location |
| Editing | Light cleanup and color check | Compositing and retouching | Retouching and selection |
| Relative cost per image | Lowest | Middle | Highest |
| Speed at volume | Fastest | Moderate | Slowest |
| Best for | Basics, knits, kidswear, multipacks | Tailoring, outerwear, structured tops | Dresses, fitted styles, hero products |
| Main limitation | No sense of body shape or fit | Editing skill required, no body context | Hard to scale across many SKUs |
The short verdict: flat lay wins on speed and budget, ghost mannequin wins on clean structure, and on-model wins on fit. A practical mix for most stores is on-model for the main image of fit-sensitive and best-selling products, ghost mannequin or flat lay for the long tail, and detail shots for everything.
Which Method Works Best for Each Clothing Category
The right lead image depends on what a shopper is unsure about for that type of garment. The last column shows how to get an on-model version when a full model shoot isn't practical.
| Category | Lead with | Why | On-model option |
|---|---|---|---|
| T-shirts, sweatshirts, basics | Flat lay | Simple shapes, graphics and color matter most | Front-facing flat lay or product image on your model photo |
| Knitwear | Flat lay plus detail | Texture and stitch need close, even light | Flat lay as try-on input, on-model for drape |
| Dresses | On-model | Length and drape drive the decision | Front-facing product image on your model photo |
| Blazers, jackets, coats | Ghost mannequin | Shoulders, lapels and structure need volume | Try-on places outerwear as an outer layer |
| Jeans, trousers, skirts | On-model or ghost mannequin | Rise, leg shape and length are hard to read flat | Product image or worn photo on your model photo |
| Activewear, swimwear | On-model | Stretch and coverage only show on a body | Product image on your model photo |
| Kidswear | Flat lay | Required for main images on some marketplaces | Not covered here |
| Multipacks, accessories | Flat lay | Shows every item in the pack at once | Not needed |
Check Marketplace Image Rules Before You Shoot
Where the photos will appear can decide the method for you. Your own storefront gives you full freedom, but marketplaces set rules for the main image, and a non-compliant main image can get a listing suppressed. Amazon's Seller Central guidance on image issues is a good example for apparel:
- A main image in apparel or accessories that shows a mannequin or hanger is flagged as non-compliant, which rules out visible-mannequin and hanging shots as the lead image.
- Apparel main images with a model who is sitting, kneeling or otherwise not standing are flagged.
- Human models in main images are flagged for softlines categories such as kids and baby, while adult apparel is the exception.
In practice, that means adult clothing on Amazon needs a standing model in the main image, while kidswear and multipacks lead with a flat lay. Rules change and differ by marketplace and category, so check each channel's current style guide when you plan the shot list, not after the shoot.
How to Set Up Clothing Photography at Home
A professional-looking flat lay or hanging shot doesn't need a studio. A clear floor area, a large window and a phone are enough to produce consistent product images.

1. Choose the space and background
Pick a spot near a large window with indirect daylight. Use a white or light gray backdrop: foam board or a large sheet of matte poster board works for flat lays, and a plain wall works for hanging shots. Mark the garment position and the tripod position with tape so every product is framed the same way.
2. Get the light even
Turn off overhead lights so warm bulbs don't mix with daylight and shift the colors. Place the garment so the window light falls across it from one side, and add a white board or reflector on the opposite side to soften shadows. Shoot at the same time of day, or use a continuous daylight-balanced lamp, to keep the catalog consistent.
3. Prepare the garment
Steam out every crease and lint-roll dark fabrics. For flat lays, smooth the garment symmetrically, fill sleeves and bodies lightly with tissue paper to add a little volume, and pin or fold excess fabric underneath. Remove tags and stickers that won't ship with the product.
4. Set up the camera or phone
Mount the phone on an overhead tripod or arm so the lens is parallel to the garment, which keeps hems and seams straight. Use the main lens rather than digital zoom, turn on the grid, and tap to lock focus and exposure on the garment. A DSLR or mirrorless camera adds manual white balance and sharper detail, but a recent phone is enough to start.
5. Follow the same shot list for every product
Consistency makes a catalog look professional. A simple shot list per product covers the front, the back, one or two detail close-ups (fabric, closures, print) and the label. Add an on-model image for fit-sensitive categories. When a product will also go through AI try-on, shoot the front view as a full, front-facing image of the garment on a plain background.
6. Edit for accuracy, not perfection
Crop every image to the same aspect ratio, clean the background to an even white, and compare the on-screen color with the garment in daylight. Color that doesn't match the product is one of the easiest returns to prevent; our guide to reducing returns in fashion ecommerce covers how imagery fits into that work.
Where AI Try-On Fits: From Flat Lay to On-Model
The trade-off in the comparison above is that the cheapest method shows the least about fit. AI virtual try-on narrows that gap. A clothes try-on API takes two images, a garment image and a photo of a person, and returns a photorealistic image of that person wearing the garment. For a store, the person is the brand's own model, and the garment is the product image it already has, so a flat lay workflow can also produce on-model images for new drops, extra colorways and long-tail SKUs that would never get a full model shoot.
Perfect Corp.'s AI Clothes Changer API works this way. Generative AI maps the clothing onto the model photo, adjusting for body shape, proportions and lighting, and it works from standard product images, with no 3D garment models required.

Actual results from Perfect Corp.'s AI clothes virtual try-on tool.
What to shoot so the garment image works
The garment image tells the AI what the product looks like, so the photography habits above carry straight into the result. The input can be a front-facing product image of the garment, or a photo of it worn by a model. Based on the AI Clothes API documentation:
- One garment, shown clearly and facing forward. A clean flat lay or packshot taken straight on works well as a product image.
- The garment fully visible. If you use a photo of the garment worn by a model, it should show one person, with the garment fully visible and not covered by hair or arms.
- Standard files. JPG or PNG, under 10MB.
What the model photo needs
Brands use their own model photos; the API Playground includes sample model photos for testing. The model photo should show one person, standing and facing forward, with the face fully visible and a background without other people or distracting objects. The result keeps that photo's pose and angle, and its resolution follows the resolution of the model photo, so a well-lit, high-resolution model photo gives a better result.

Actual results from Perfect Corp.'s AI clothes virtual try-on tool.
What it doesn't replace
AI try-on is one route to on-model images, not a replacement for every method. It doesn't create ghost mannequin images, so structured pieces may still need a mannequin shot. It places the garment in the pose of the model photo you provide rather than generating new angles or a 3D view, so back views and detail shots still come from your own photography. It is also a visual preview, not a size recommendation: fit information for shoppers still belongs in your size chart and product copy.
AI Clothes API Playground
Upload a product image and a model photo, and see the on-model result before you build.
Adding Virtual Try-On to Your Catalog Photo Workflow
For a single seller, try-on fills gaps in a gallery. For ecommerce and catalog teams, it becomes a step in the photo pipeline: every product that is photographed flat can also be published on-model, using the same model photos across the whole catalog for a consistent look.

Who uses it
- New clothing brands that need launch imagery before they can fund regular model shoots. Our guide on how to start a clothing brand covers where imagery sits in a launch plan.
- Resale and secondhand marketplaces, where every listing is a one-off item photographed by a seller. See how virtual try-on works for resale marketplaces.
- Clothing rental platforms with large, rotating inventories. The steps are in how to start a clothing rental business.
- Retailers planning seasonal campaigns that need on-model images for new arrivals quickly, as covered in these holiday marketing ideas for fashion brands.
What the API handles
The AI Clothes Changer API is a RESTful API with Bearer authentication and JSON responses, and each request returns a photorealistic try-on image URL. It covers outerwear, dresses, tops, bottoms, swimwear, lingerie, shoes and more, as full or partial outfits, with jackets, coats and vests placed as an outer layer over the clothing already in the photo. It connects to websites, iOS and Android apps, in-store kiosks and backend systems, with sample code for JavaScript, Java, Flutter, Python, PHP, Node.js and cURL.
How to get started
- Create an account and get an API key in the API Console.
- Test your own product images and model photos in the API Playground.
- Follow the developer guide to connect the API to your catalog or listing flow.
- Compare pay-per-use plans on the API pricing page, or talk to the team about a larger rollout.
Perfect Corp. has more than 10 years of AI and AR development behind it, and over 800 global brands have used its technology. The platform is ISO/IEC 27001:2022 certified, and GDPR is applied company-wide.
For catalog and ecommerce teams
Plan a try-on rollout for your catalog with Perfect Corp.'s team.
FAQ
What is the best way to photograph clothes for ecommerce?
Choose the method by category: flat lay for basics, knits and multipacks, ghost mannequin for structured pieces, and on-model for dresses and fit-sensitive products. Shoot every product with the same light, background, framing and shot list, and check your marketplaces' main image rules first.
Is ghost mannequin better than flat lay?
For structured garments like blazers, coats and shirts, ghost mannequin usually shows shape and silhouette better than a flat lay. Flat lay is faster and cheaper and works well for simple shapes, prints and knits. Many stores use both.
How do you take pictures of clothes to sell without a mannequin?
Use a flat lay: steam the garment, lay it on a white or light backdrop near a window, fill it lightly with tissue paper, and shoot from directly above with the camera parallel to the garment. Hanging the garment on a wall hook against a plain background is another option for secondary images.
Can I take clothing product photos with a phone?
Yes. A recent phone on an overhead tripod, used with window light and the main lens, produces sharp, consistent product photos. Lock focus and exposure on the garment and avoid digital zoom.
What background is best for clothing photography?
White or light gray is the standard for product pages and marketplaces because it keeps color accurate and images consistent. Lifestyle backgrounds work well for on-model and social images.
Do you need a model to sell clothes online?
Not always. Flat lays and ghost mannequin images can carry a listing, but on-model images help shoppers judge fit, and some marketplaces require a standing model in the main image for adult clothing. AI try-on can place a product image on your own model photo when a shoot isn't practical.
Can AI turn a flat lay into an on-model photo?
Yes. A virtual try-on API such as the AI Clothes Changer API can take a front-facing product image of the garment, or a photo of it worn by a model, and place it on your model photo.
Conclusion
Good clothing photography is less about one perfect method than about matching each method to what shoppers need to see. Flat lays keep a catalog fast and affordable, ghost mannequin images give structured pieces their shape, and on-model photos answer the fit question that drives most clothing purchases. With a consistent home setup and a clear shot list, a small team can cover all three, and AI virtual try-on lets the flat lays you already shoot become on-model images for products that would never get a model shoot.
Start with the API Console
Get an API key and test the AI Clothes Changer API on your catalog.
This article was edited and reviewed by the Perfect Corp. editorial team. Welcome to contact us or give us more suggestions.